search this blog

7.26.2013

before & after: my $1 stool


One of the many reason I love summer is because of the fact that I can go outside and SPRAY PAINT! Hot dang I love to spray paint! When I picked this stool up for $1 at a yard sale last summer I knew it needed a major overhaul. The seat was ripped and the frame had seen a better day. It was just so... blah looking.

For a year, it's been living in our basement (I had good intentions of finishing it). Last week, I picked up a few cans of spray paint, recovered the seat with a piece of fabric from my stash and now I have a bright & cheery new stool.
I love it's yellow & white-ness :)
It's so much better than what it used to be.

... a few tips about spray painting almost anything ...

1) Make sure your object is nice & clean. Get rid of any dust, dirt, grease or gunk. This will help the paint stick better.
2) I usually skip the "priming" step and buy a spray paint that has primer built in. Make sure it is meant for the material that you are painting (in my case: metal).
3) Do 3-4 very light, even coats of paint instead of 1-2 thick gloppy ones. This will prevent runs and will give your piece a nice durable finish.
4) Don't be afraid! In this case, all I had to loose was the $1 that I spent on this stool. What's the worst that can happen?
Happy spray painting! What have you spray painted lately?
Photobucket
[p.s. this post may be linked to any number of these blogs]


[SIDE NOTE:  To recover the seat, I removed the ripped vinyl/leather to find a thick piece of foam & a wood disc (which the base had been screwed in to). I added another thin layer of foam (for added "cush") and pulled & stapled my fabric around the cushion to the bottom of the wood disc. This is a similar process as you'd do to recover a dining chair. It didn't maintain its exact shape (since it was almost a boxy circle... If that makes any sense), but the added foam made it a lot softer and more comfortable. It was really just a trial & error process since I had never recovered anything like this before.]

7.23.2013

washi tape cards


I know washi tape EVERYTHING has been done already... but I have to admit... this is the first time I've ever used washi tape on anything! I know. It's kinda crazy.

Adam and I attended a wedding over the weekend and I wanted to include something handmade with the gift we bought for the newlyweds. I remember going through a ton of "thank you" cards after our wedding so I made the bride a few "thank you" cards to add to her stash.

They were simple to make and didn't take much time at all. I really love having handmade cards on hand for when I need them so I am going to make a few more to add to my own stash in my card binder.
Photobucket
[p.s. this post may be linked to any number of these blogs]

7.15.2013

recipe card shopping lists


As I mentioned in this post about my goal to never send a late birthday card again, I'm making a push to get more organized. One thing I HATE doing is making a grocery list. No matter what, I seem to miss something in my hurry to jot things down that I end up making another trip to the store.
My solution? Laminated recipe cards that double as a shopping list!

... what I bought ...

scotch self-seal laminating pouches (4"x6")
dry erase markers

... what I did ...
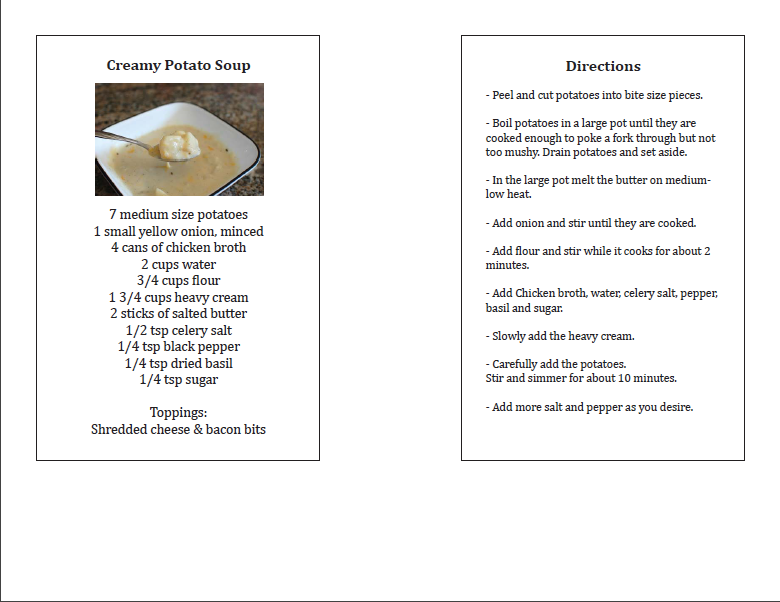
1) I started by formating my recipes into 4x6 sizes. I put the name, picture & ingredients on one side with the directions on another side. I used Adobe InDesign but you could use Word (or some other similar program).


2) Next, I printed color copies. I trimmed them down to size and self laminated them using the pouches I had picked up. This was a little tedious but I knew it would be worth it in the end!


Now I have recipe cards that double as shopping lists. The laminated cards also stay A LOT cleaner if you drip on them while cooking. I can't tell you how many ratty paper recipes I have in my kitchen that have vanilla extract splashed on them or greasy butter marks.


As long as I have a dry erase marker with me, I'll be able to cross things off my list at the store, wipe it off when I get home and re-use them many times!


Want some of my pre-made recipe cards??? You can download them here:
(disclaimer: some of these recipes are not mine - they were found on other blogs, pinterest, etc. I apologize in advance for not giving proper credit)

Creamy Potato Soup
Apple Dumplings
Chicken Ranch Tacos
Crock Pot French Dip Sandwiches
Oven Tacos
Philly Cheese Steak Stuffed Peppers
Curry Chicken Noodle Soup (this also has a little basic "grilling check list")
Everyday shopping list


Photobucket
[p.s. this post may be linked to any number of these blogs]

7.12.2013

guest post: spray paint earrings

Hey everyone, my name is Randi and I am coming here from Sowdering About to share with you a recent craft of mine.  I have been dabbling in making jewelry lately and came up with this super easy way of making some pretty neat earrings.  Oh and did I mention they were cheap?


I bought these little metal pieces from a craft store when we first moved to Seattle.  I really liked how they looked and although at the time I had no idea what I was going to do with them, I had to have them.  Plus I think they were maybe $1 for the pair. 

And they are pretty right?  


When I was cleaning up and organizing all my craft stuff (why is there so much stuff?  I swear it just multiplies), I came across them again since I had lost them for a while.  I had just finished working on my washi tape earrings, so when I found them, I immediately thought EARRINGS!  It worked out well too since all my jewelry making stuff was already out.

They needed color though.  They needed to be teal.

It just so happened that I am currently obsessed with teal and I want everything in my life to be teal.  So I took these bad boys outside to my work table and spray painted them.


Once they were dry, I looped a ring and a fishhook through them and viola!  Brilliance.


The spray paint I used was a satin finish.  They aren't super shiny, but they aren't flat either.  They are SUPER lightweight too.

Total time with drying was about 20 minutes.  Total cost was about $1.50.  

What do you think?  Do they live up to their name?  

Thanks for having me here today!  I look forward to visiting again!

Randi blogs in a blue recliner from the wet city of Seattle where she and her family live.  She blogs about her crafting adventures and parenting trials, because if you can’t find humor in your own life, then who will?  You can also find her on Facebook, Twitter and Pinterest.


Related Posts Plugin for WordPress, Blogger...