
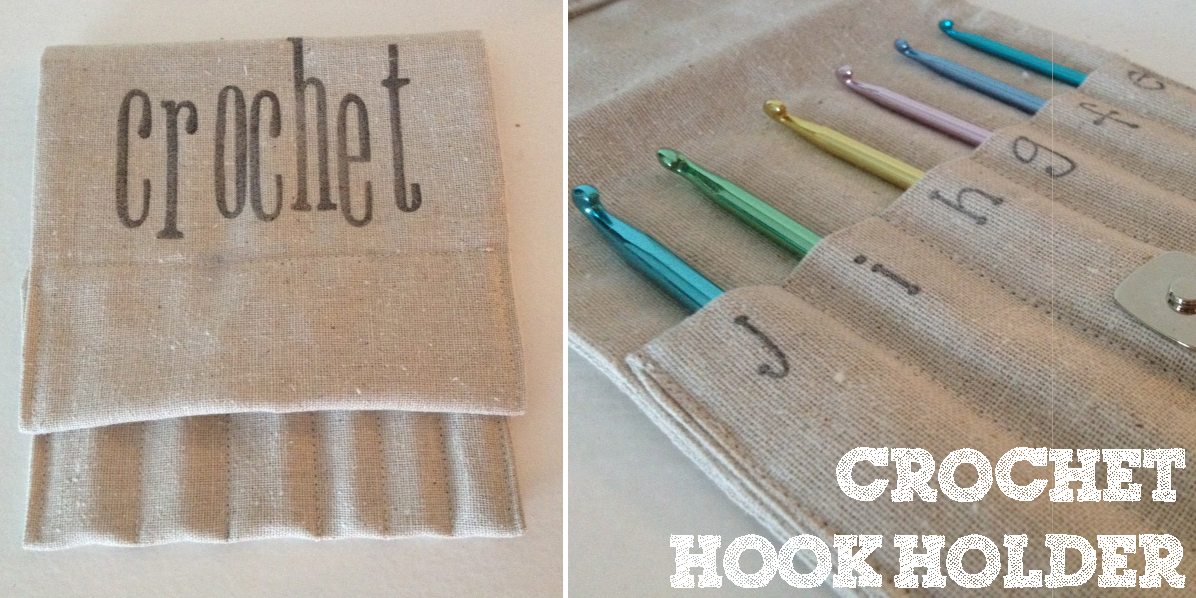

I have this theory. Everything is better in it's own unique, cute, little case. Yes? Ok, maybe it's just me. Anyway, I decided to make a little case for the crochet needles I got my mom for Christmas. One of these days I am going to teach her how to crochet :) In the mean time, you can make a fun little case for your own hooks.
__________________________________
Here is what you'll need:
6.5" x 35.5" piece of linen (or any other fabric)
crochet hooks
a magnetic clip
letter stamps & ink
sewing machine
wax paper & pencil (optional)
__________________________________
[1] Start by prepping your fabric. Iron and cut a piece of fabric that is 6.5" x 35.5". Fold your fabric right sides together "hamburger style" (your fabric will now be 6.5" x 17.75") and sew around all sides (leaving 2-3 inches on one of the short sides for turning). Turn your piece right side out and press flat.


[2] Next, using your crochet hooks as a guide, fold the bottom of your fabric up to cover 3/4 of your hooks. Pin both sides in place.
[3] Now is when you'll put on your magnetic clip. Follow the instructions on the package to do so. I placed my clip about 2 inches from the bottom (centered on my holder).

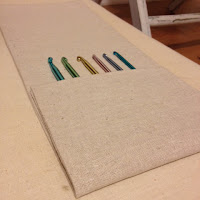

[4] Now, using wax paper, draw guide lines for your pouch divisions. I like to do this because it ensures nice straight lines. You can sew directly over your wax paper. When you're finished, carefully peal the wax paper off and throw it away. You'll be left with nice straight lines!
If you'd like, just go for it and sew with the wax paper. What's the worst that could happen? I used my zipper foot around my clip.
As for the sides, leave them both open for now. They will get stitched down in a later step.


[5] Moving to the top of your case, top stitch across your opening from step 1 that was used to turn your piece.
[6] Fold the top edge over a few inches and press with your iron. This length will vary based on your magnetic clip placement. Install the other half your clip under your newly created flap. Before committing to the placement, check to see that both parts of the clip line up.


[7] Once your clip is in place, sew straight down both of the sides to secure your flap and hook pockets. Decorate with rubber stamps and you have a cute little case for your crochet hooks.


I absolutely LOVE LOVE LOVE this case! So fun! I love the stamps!! Definitely Pinning this to make later!!
ReplyDeleteSo cute! Everything is DEFINITELY better in it's own cute little case. :)
ReplyDeleteI'd love for you to share this at my link party! http://rainbowsandhoneysuckle.blogspot.com/2013/01/craft-yourself-crazy-link-party-2.html
Chloe
That is super-cute! Thanks :-)
ReplyDeleteGorgeous .. and I love the labelling - very cutesy matootsy! x
ReplyDeleteGorgeous! And I love the labelling ... very cutesy matootsy! x
ReplyDeleteI just started learning to crochet last night! I think I've got the chain stitch down, haha. Gonna have to make one of these if I keep at it!
ReplyDeleteI definitely need one of these!
ReplyDeleteI just started crocheting and am having fun, but I can't stand the unorganization that is my crochet basket. I'm making one of these...asap!! SO cute...LOVE, LOVE , LOVE!
ReplyDeleteps...thanks for linking it up at Think Tank Thursday!
I loved this so much I had for feature it over at Think Tank Thursday today!
Deletehttp://www.saving4six.com/2013/01/think-tank-thursday-13.html
I just got some hooks for Christmas too! I will have to make a case like this.
ReplyDeleteI love how you stamped the sizes! I need to learn to sew now so I can make one of these.
ReplyDeleteShannon, love this project!
ReplyDeleteThis is so cute, SHannon! I bet this would be super cute for a little craft bag - for pencils and crayons and such! btw, as I typing to you, your comment on my post came up! lol!
ReplyDeleteThis seems creative and lovely :)
ReplyDeletehttp://sewzan.blogspot.com
I love the rubber stamps. They made the letters look perfect! Thank you for bringing the best stuff to Whimsy Wednesday!
ReplyDeleteSweetly,
Kelly from Smart School House
http://www.facebook.com/SmartSchoolHouse
Hi Shannon, I love this little carrier and need one myself. lol I'm featuring you on Transformed Tuesday later tonight. Thanks for linking up and can't wait to see what you link up this week. Hugs, Peggy
ReplyDeleteI want to learn how to crochet. I've tried a few times on my own and didn't succeed. Not sure why because I am a crafty person. It is a goal to learn this year! Maybe I will reward myself with this cute hook holder!
ReplyDeleteI am just teaching myself to crochet and now I have to sew myself this cute little holder! Love it(;
ReplyDeleteSuper smart. I need to make this for my mom! Thanks for linking up to Monday Funday!
ReplyDeleteSo cute! I love the way you stenciled on the hook letters. So smart! Thank you so much for sharing.
ReplyDeleteMelissa
redflycreations.com
Super cute project!!! Love it and need one! Thanks so much for sharing the great tutorial!
ReplyDeleteHave a fabulous day!
Hugs from Portugal,
Ana Love Craft
www.lovecraft2012.blogspot.com
Yes! So cute and much better than the plastic case your hook set comes in.
ReplyDeleteI'd love if you shared this project at my Show & Tell party this week. http://www.gingerlymade.com/2013/01/show-tell-9.html
Thanks for the great tutorial!
ReplyDeleteThis is so awesome. My goal for 2013 is to learn to crochet. So I'll have to make one of these to get me going.
ReplyDeleteLove this. My sister crochets so I'm going to try to make this for her. I'm following you now and look forward to reading more.
ReplyDeleteLOVE it! I don't crochet, but I'm willing to start.. just to own a holder like that!
ReplyDeleteThanks so much for sharing this at The DIY Dreamer... From Dream To Reality! I'm looking forward to seeing what you link up tomorrow evening!
Hi Shannon. Thanks for linking this up to my blog. I love your blog. I will be following through google reader. Can't wait to see more from you. The next link party starts today in a few hours. I hope you can link up again. http://www.ifitsnotbaroquedesignblog.blogspot.com/
ReplyDeleteTotally LOVE this and want to make one! :)
ReplyDelete