search this blog

3.31.2013

the weekly creative #27


Welcome to week #27 of The Weekly Creative!

Happy Easter! I hope everyone is spending the day relaxing with friends and family. We had "lunch" at my sister-in-laws with my husband's side of the family and now a "Pinterest Dinner" with my side of the family at my aunt and uncle's house. Everyone brought a recipe from Pinterest that they've been wanting to try! I was responsible for and appetizer so I made this delicious spinach and artichoke dip and these crispy edamame. Yum!

Now...onto this week's party.

I had a crazy busy week so I won't be doing features today. Sorry! I'll be back to a regular link party next week... I promise :)

Thanks for stopping by to link up!


Photobucket


3.28.2013

faux bois art


Sometimes, the most satisfying projects are the kind that are "easy, free, & done in under 5 minutes." With how hectic this week has been around our house, this little makeover was just what we needed. Now that we've settled on a new couch for our family room (it'll be here in about 8 weeks) we've been trying to add those important finishing touches to the room. 

A few weeks ago, I took a trip to Ikea with my cousin and had a few Ribba frames sitting around waiting for art. I decided that it was time to just hang them - whether they had art in them or not!


I found this AMAZING faux bois wrapping paper at HomeGoods the other day and thought it would be the perfect filler until we found some art that we liked. Well... the birch-y wood grain just might stay around for the long haul! We love it :) Here is what we're dealing with now:

EXISTING                                                         OUR PLAN

Our plan is GREY & ORANGE! We are in search of an orange lamp for our entertainment center and some fun fabric so I can finally makeover that chair in the corner (it currently has fabric tucked around it and gets all bunchy and wrinkled. The wood frame needs sanded down and refinished because it's covered in scratches and scuffs).

As for the couch, it's going to be a soft, textured grey. The leafy orange/grey/cream fabric is for pillows (and the fuzzy orange pillow I got from Crate & Barrel). I'm loving it! Orange/grey/cream has to be my new favorite color combination. 


We're on a "home decor" kick so keep an eye out for more transformations that will be hitting the blog soon.

What quick & easy updates have you done lately?


Photobucket
[p.s. this post may be linked to any number of these blogs]

3.26.2013

sunshine makings: infinity cowl


I had the privilege of testing Sunny Stitching's infinity cowl pattern before she posted it to her Etsy site, Sunshine Makings. Jessica's pattern is fun, easy to understand and the final product is BEAUTIFUL.

Jessica's picture:

I'm not a very advanced crocheter, so if I could make it, you could too!

Check out her new pattern here :)
Happy crocheting!

[Oh...and if you don't crochet, Jessica sells the finished infinity scarves here].


Photobucket
[p.s. this post may be linked to any number of these blogs]

3.24.2013

the weekly creative #26


Welcome to week #26 of The Weekly Creative!

This week was a busy one! I didn't get much crafting done so today I've been working on a few projects I've had in the back of my mind all week :) I can't wait to share them with you soon.

Does anyone else feel like the weeks are FLYING by so quickly? I can hardly keep up with things around here. It seems like my head is spinning... Looking forward to seeing all of your projects this week :)

Now...onto this week's party.

Here's how The Weekly Creative link party works:

#1 Each week I will be featuring the most viewed link, my favorite diy/craft/home project & my favorite recipe. I'm sticking with 3 features but I have divided them into categories now.

#2 Each month, I will be featuring one project on my sidebar - the project that gets the most views during all of the link parties during that month. It will have a picture of the project with a direct link to the post on your blog. This will hopefully direct more traffic to YOU! 

#3 All features will get promoted on my Facebook page and pinned to Pinterest. I have created a board specifically for features - feel free to follow along. 

Link up as many projects, recipes, etc. as you'd like. No giveaways or etsy shops please. 
Visit some other blogs and show them some love. Simple as that.

Here are the features from last week:

MOST VEIWED:
kid's easter art by pink for pinkie

MY FAVORITE DIY/HOME PROJECT & RECIPE:
printable seed packed labels by just dawnelle & blueberry almond pastry by carrisa miss


If you were featured, don't forget to grab a featured button from the sidebar under the tab "grab a button."
Thanks for stopping by to link up!

Photobucket


3.21.2013

guilt free blended coffee

I would love to walk into Starbucks everyday and order a grande caramel frappuccino without feeling guilty about the money I'm spending and the empty calories I'm drinking. They are like heaven in a cup. Seriously. 

When I was in search of a "homemade" blended coffee drink I wasn't impressed with anything I found. I'm picky. One day, I came up with this random concoction and I love it. It's yummy and coffee-y without being sickening sweet or pricey. It's also simple (which is key for mornings before work).
_______________________________________________________

Guilt Free Blended Coffee
7-8 frozen coffee ice cubes
1 1/2 cups fat free milk
a pinch of salt
a splash of vanilla extract
1 scoop of Slim Fast "Chocolate Royale" powder


Combine all ingredients into the blender and blend until smooth.
Yields about 16 oz.
Only 252 calories!
_______________________________________________________

Since I've been making these, I always have brewed coffee in the fridge to re-fill my ice cube trays. It's easy to make a big pot of coffee at the beginning of the week and stash it in the fridge for later use.


Also, I've concluded that this is only 252 calories. 

As you can see on the side of the Slim Fast can, 8 oz of milk + 1 scoop of Slim Fast powder is 200 calories. With the addition of another 1/2 cup milk (40 calories), a splash of vanilla extract (1 tsp = 12 calories) and a small amount of brewed coffee (practically 0 calories) we're only up to 252 calories.


Yum! Guilt free goodness to start my day!

Photobucket
[p.s. this post may be linked to any number of these blogs]

3.17.2013

the weekly creative #25


Welcome to week #25 of The Weekly Creative!

Happy St. Patty's Day! It's funny... Our weekend was filled of getting rid of green. We spent Saturday painting our basement. When we bought the house, there was SO MUCH GREEN! It wasn't really a nice green... although, maybe it was and we just hated it because of overload. This is what the basement looked like when we bought it and how it looks now:

BEFORE                                                                    PROGRESS

Adam put in recessed lighting and the walls have a fresh coat of light, neutral paint. He also fixed up the basement down there (I'll have to post pictures of that at a later time). We still have lots to do but it's coming along. Soon it'll be a really liveable space!

Now...onto this week's party.

Here's how The Weekly Creative link party works:

#1 Each week I will be featuring the most viewed link, my favorite diy/craft/home project & my favorite recipe. I'm sticking with 3 features but I have divided them into categories now.

#2 Each month, I will be featuring one project on my sidebar - the project that gets the most views during all of the link parties during that month. It will have a picture of the project with a direct link to the post on your blog. This will hopefully direct more traffic to YOU! 

#3 All features will get promoted on my Facebook page and pinned to Pinterest. I have created a board specifically for features - feel free to follow along. 

Link up as many projects, recipes, etc. as you'd like. No giveaways or etsy shops please. 
Visit some other blogs and show them some love. Simple as that.

Here are the features from last week:

MOST VEIWED:

MY FAVORITE DIY/HOME PROJECT & RECIPE:
diy egg basket light by 2 little superheros & peeps in a nest by diana rambles


If you were featured, don't forget to grab a featured button from the sidebar under the tab "grab a button."
Thanks for stopping by to link up!


Photobucket


3.15.2013

1 minute headband


The title of this post is truer than true. It might even take you LESS than 1 minute if you're quick :)

The other day I decided that I was sick of my other headbands that I wear all the time and wanted something simple to wrangle back my curls. I had purchased some elastic ribbon over a year ago when I made these flower headbands and had a bunch left over. A quick snip & a simple knot later and I was ready to go with my new simple headband.

Here's what you'll need:
Elastic ribbon
Scissors
ruler (optional)

I bought my elastic ribbon on Etsy. 
I have no affiliation with any of these shops but here are some good sources:


[HOW TO] 
Wrap your ribbon around your head for a quick measurement. 
I ended up cutting my ribbon 20" long.
Tie a little knot on the end and you're ready to rock your new headband.


I told you it was simple. 

These are so fun because for pennies you can have fun stretchy headbands in lots of different colors.

Oh, I also made a bunch of stretchy hair ties. I have heard that they are better for your hair (plus they are pretty). These are for sale ALL over Etsy, but they are so easy to make if you have the supplies on hand. 

[HOW TO]
I simply wrapped the ribbon around my wrist to make sure it would be comfortable. 
I snipped my ribbon to size (8" long) and tied them in knots.
Ta-da! Just as simple as the headbands.


Enjoy your new hair accessories. Oh, and I couldn't help but share this picture.
This is for all of my curly-haired readers.


Amen!


Photobucket
[p.s. this post may be linked to any number of these blogs]

3.12.2013

"fake" pops


You're probably raising an eyebrow at the title of this post...

... I didn't want to call them "cake pops" because I didn't actually use ANY cake to make these treats. For my nieice's 1st birthday I volunteered to make cake pops! Soon after, I knew that it was going to be A LOT of work (especially considering that there were 70 people going). My cousin gave me the idea of using donut holes to simplify the process and they were a hit!


The day before the party, I picked up 3 dozen donut holes from our local donut shop. I got plain cake donut holes (no icing). My sister-in-law also picked up a bunch of other goodies: marshmallows, brownies, rice krispy treats, etc. They were all store bought and ready to go. This REALLY cut down on prep time.


Here are some tips I learned about making cake pops (or "fake" pops, if you will). These same tips will apply to regular cake pops if you're daring enough to take on the challenge.

Tip #1:
Melt your chocolate with a little bit of shortening

Pure melted chocolate is delicious, but it can be globby (yes, that's a real word). If you add a little bit of shortening to the chocolate it thins it out a bit and makes your treats easier to dip.


Tip #2:
Stick your stick

Yes, this sounds funny. But I'm serious. You don't want your donut hole to flop off into your chocolate. Pre-poke holes in your treats, dip the stick in the melted chocolate & then put the stick back into the hole. The chocolate will harden and "glue" your treat to the stick. This is a huge time saver and mess preventer.


Tip #3
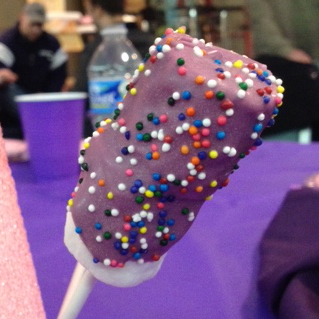
Let your chocolate dry a bit before decorating

Sprinkles, especially the larger "pearl" kind, tend to slip off the chocolate when it's still wet and drippy. Let your cake pops dry for a few minutes before decorating. It'll help your sprinkles stick for the long haul. I used a piece of styrofoam to keep my pops upright while they dried. It worked like a charm.


So when it was all said and done, I made almost 60 fake pops! It was a lot of fun and they were a big hit at the party. They were also really yummy... which is the most important part.


What I learned is that they don't have to be perfect. They don't have to look like cake pops in a magazine. If you have fun and put your little touch on them, they'll be perfect in their own ways.

Photobucket
[p.s. this post may be linked to any number of these blogs]
Related Posts Plugin for WordPress, Blogger...