search this blog

Showing posts with label before & after. Show all posts

7.26.2013

before & after: my $1 stool


One of the many reason I love summer is because of the fact that I can go outside and SPRAY PAINT! Hot dang I love to spray paint! When I picked this stool up for $1 at a yard sale last summer I knew it needed a major overhaul. The seat was ripped and the frame had seen a better day. It was just so... blah looking.

For a year, it's been living in our basement (I had good intentions of finishing it). Last week, I picked up a few cans of spray paint, recovered the seat with a piece of fabric from my stash and now I have a bright & cheery new stool.
I love it's yellow & white-ness :)
It's so much better than what it used to be.

... a few tips about spray painting almost anything ...

1) Make sure your object is nice & clean. Get rid of any dust, dirt, grease or gunk. This will help the paint stick better.
2) I usually skip the "priming" step and buy a spray paint that has primer built in. Make sure it is meant for the material that you are painting (in my case: metal).
3) Do 3-4 very light, even coats of paint instead of 1-2 thick gloppy ones. This will prevent runs and will give your piece a nice durable finish.
4) Don't be afraid! In this case, all I had to loose was the $1 that I spent on this stool. What's the worst that can happen?
Happy spray painting! What have you spray painted lately?
Photobucket
[p.s. this post may be linked to any number of these blogs]


[SIDE NOTE:  To recover the seat, I removed the ripped vinyl/leather to find a thick piece of foam & a wood disc (which the base had been screwed in to). I added another thin layer of foam (for added "cush") and pulled & stapled my fabric around the cushion to the bottom of the wood disc. This is a similar process as you'd do to recover a dining chair. It didn't maintain its exact shape (since it was almost a boxy circle... If that makes any sense), but the added foam made it a lot softer and more comfortable. It was really just a trial & error process since I had never recovered anything like this before.]

7.03.2013

family room reveal

When we first bought our house, we didn't fall in love with it for the way it was. In fact, we really had to use our imagination before we even stepped foot in the front door. What we fell in love with were certain elements of the house and from there we began working on turning it into our dream home. A little vision goes along way! Plus... you know... some blood, sweat & tears help too.

The room we really loved when we purchased our 1950s ranch was the family room. It is a large, bright room with original built-ins flanking a stone fireplace that had never been burned in! We were ecstatic over the possibilities this room held.


A little over 2 years later and that ruby red "before" room now looks like this:


... breakdown of what we've done ...

:: tore out the carpet (4 hours after getting the keys) and refinished the oak floors (with the help of our parents) before moving in a month after settling
:: gave everything a fresh coat of paint (walls, trim, built-ins & mantle)
:: added a pop of grey to the back of the built-ins to give them some life
:: re-tiled the flat hearth in front of the fireplace
:: hung curtains
:: built a sofa table to run under the extremely large picture windows
:: wall mounted the tv & built a custom entertainment center
:: saved up our money to buy a new couch!
:: made new pillows for the couch (using this process)
:: added some character to our sofa table with our cactus house
:: added some "air plant art" above the fireplace mantle
:: had gas logs installed in the fireplace
:: defined the whole room with Flor tiles to make everything feel cozy
:: added new knobs to the built ins to add a little more of our eclectic personalities to the space
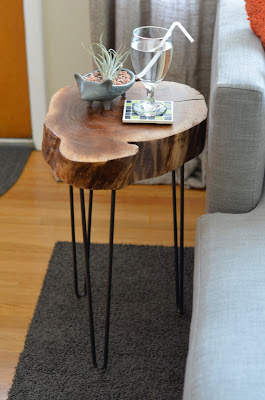
:: built tree stump side tables
:: hung some fun art 
:: brought in some "no maintenance" plants in the form of paper flowers, knit cacti & pom pom flowers.


My advice to anyone designing a space - take your time, only add in things that you absolutely LOVE and you will have a space in the end that you can't help but be proud of.


Photobucket
[p.s. this post may be linked to any number of these blogs]

6.21.2013

before & after: tree table

After we bought our house (and before I started blogging) we had this happen...


Yes, that is a gigantic tree branch... that fell on our house. What's crazy is that you have to look really close to even seen that there is a house there! It was a very sad day for 2 brand new [first time] home owners. After some help from our friends, family & new neighbors we were able to get the backyard cleaned up and Adam fixed our damaged porch roof. Good as new.

What we had now was a large pile of leftover wood from the tree branch that came crashing down in the wind storm. Adam, being the handy man that he is, made this beauty:


It's kind of ironic that this lovely table was part of something that had originally given us such a headache. We love the story behind it and the character that it brings to our family room. 

I think we win, tree!


Here's a simple breakdown of how the project was completed:
1] cut tree limb into a 3"- 4" thick disc
2] allow to dry so bark can be removed
3] sand until smooth
4] coat with polyurethane for durability (Adam did 6 coats with a foam brush)
5] attach legs - we ordered ours from here (note: he was a really great, friendly etsy vendor & the legs are excellent quality. We'll definitely be ordering from him again in the future.)

Photobucket
[p.s. this post may be linked to any number of these blogs]
Related Posts Plugin for WordPress, Blogger...