
When doing any home renovation, preparation is KEY! We knew we were getting ourselves into a huge project when we decided to DIY our 1950's bathroom. For us, a renovation was a necessity - we have duct tape in the shower holding up the old tile for crying out loud! With a solid plan of attack (and a lot of love & teamwork) we knew that we'd someday have a bathroom we could be proud of.

Here is how we tackled planning our bathroom remodel.
1) WE BUDGETED
We first sat down and figured out how much money we could spend. This is never the fun part but it needs to be addressed BEFORE making any big decisions. Once we had a figure in mind, it helped us look reasonably at the choices we had to make. We were pretty much gutting the bathroom and knew that we'd need to replace everything from the bathtub down to the toilet paper holder. Being realistic with money helped us put the renovation in perspective.
Our helpful tip for this step: get a folder, zippered bag or envelope to keep all of your "renovation receipts" in. It helps to keep them all in one spot for easy access.
We also find it helpful to make a spreadsheet. Make a column for items that need to be purchased. In the next column, put your "best guess" or "budgeted" amount next to that item. After you've made the purchase, fill in the actual amount you spent in the 3rd column. This will help you see how close you're staying to your original budget.

2) WE FIGURED OUT THE BIG IMPORTANT STUFF
Here is what we absolutely knew:
- We needed/wanted to replace the old peachy pink bathtub. It was ugly and it was super slippery because it was smooth on the bottom. We looked into getting it recoated but decided that it wasn't a route we wanted to take. With the tightness of the hallway, we were unable to get a full fiberglass unit in so we opted for a new cast iron tub with new tile on the walls.
- We absolutely hated how cramped the overall room was and decided that the closet had to go to create more space (physically & visually). We knew that we'd need to find a secondary storage option in the bathroom to make up for no closet.
- We had to (and I mean HAD to) keep the laundry shoot that we've grown to love. Having laundry in the basement is not fun, but having a laundry shoot makes it SO much better. Plus, when Adam's in the basement and I'm upstairs it's our way of communication. It had to stay!
- We knew we were going to tile the floors. I work in a flooring & design store so I knew I could get us a pretty good deal on tile ;)
3) WE HAD A LITTLE FUN WITH THE DESIGN
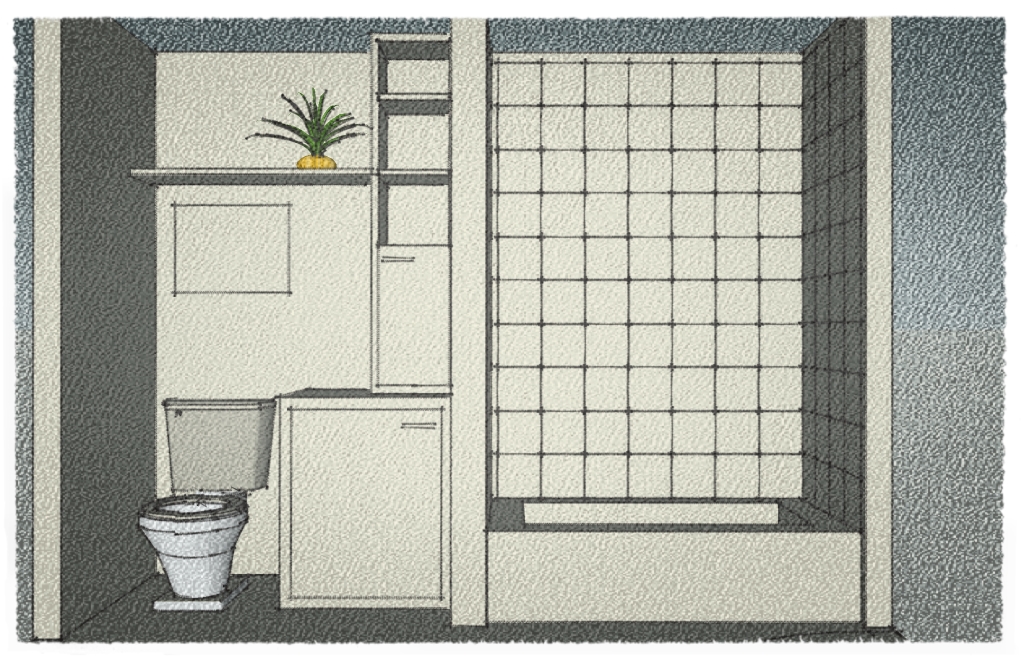
Once we knew what had to stay/go/change/adjust we moved onto the fun part of the renovation... DESIGN!! We talked so much about design that I swore I would see the new bathroom finished when we turned the lights on at night to brush our teeth. I could see the finished product in my head and had to get it down on paper (or computer). Using a free program called SketchUp, I came up with these basic design ideas to help us visualize the space.
Our helpful tip for this step: If you're not into drawing, find inspiration on Pinterest, Houzz or in magazines. I always tell my clients to just start saving images they like - usually when you look back through those images you find reoccurring themes that you might not notice when first looking at an image (i.e. contemporary lines, color themes, etc). Look look look... you're bound to find a ton of inspiration no matter where you search.


At this point, we weren't sure what vanity we were going to use (although we had looked a bit) and we had NO idea what we were going to replace the closet with. We wanted something that would have a lot of storage and would also accommodate our beloved laundry shoot. At this point we knew it was time to start making some decisions...
4) WE STARTED SEARCHING FOR THE GOODS
Tile was probably the easiest decision we made. My discount at work scored us some nice, neutral 12x12 floor tiles and pretty white gloss 8x8 wall tiles for the shower. Both were very budget friendly and went along with the clean design we had planned. We knew we could spice them up a bit with the right pattern & grout color.
With our tile in hand, our next 3 big ticket items were a new bathtub, a vanity & a storage unit to replace the closet. Here is what we came up with:


ReplyDeleteThis is a big achievement! The re-modeled version looks fantastic. The cutest part was "Closed my eyes and swapped the card"
Keep up the good work ;)
Love
jessica x
first Shannon. I didn't know you worked in a tile store ... dish. second ... I too share your fondness with the laundry shoot - it was my all time favorite thing about my mom's house, the one I grew up in (I hope I am not being too forward >> buildingmoxie dot com/2010/08/echos-of-yesterday-down-the-laundry-chute/) third ... you got some design skills on you. plus. spreadsheet = good, project folder = great - nail it right up on a stud when you get the space demoed ... you do look like you know what you are doing. ha! I am excited for you. ~jb
ReplyDeleteYou have thought of everything. :) Thanks for sharing your tips, and I look forward to seeing your bathroom.
ReplyDeletelove these tips, and especially number 5.... it's definitely like "take a deep breath and just do it. and then have some wine."
ReplyDeleteConducting a home renovation project can really be fun and exciting, but it can be daunting too! However, if you really prepare for this one, I’m sure that even the slightest setbacks won’t affect you. You can handle every problem easily and you can just consider it as part of your renovation adventure.
ReplyDeleteGabrielle Jeromy @ Majestic Exteriors