search this blog

7.03.2013

family room reveal

When we first bought our house, we didn't fall in love with it for the way it was. In fact, we really had to use our imagination before we even stepped foot in the front door. What we fell in love with were certain elements of the house and from there we began working on turning it into our dream home. A little vision goes along way! Plus... you know... some blood, sweat & tears help too.

The room we really loved when we purchased our 1950s ranch was the family room. It is a large, bright room with original built-ins flanking a stone fireplace that had never been burned in! We were ecstatic over the possibilities this room held.


A little over 2 years later and that ruby red "before" room now looks like this:


... breakdown of what we've done ...

:: tore out the carpet (4 hours after getting the keys) and refinished the oak floors (with the help of our parents) before moving in a month after settling
:: gave everything a fresh coat of paint (walls, trim, built-ins & mantle)
:: added a pop of grey to the back of the built-ins to give them some life
:: re-tiled the flat hearth in front of the fireplace
:: hung curtains
:: built a sofa table to run under the extremely large picture windows
:: wall mounted the tv & built a custom entertainment center
:: saved up our money to buy a new couch!
:: made new pillows for the couch (using this process)
:: added some character to our sofa table with our cactus house
:: added some "air plant art" above the fireplace mantle
:: had gas logs installed in the fireplace
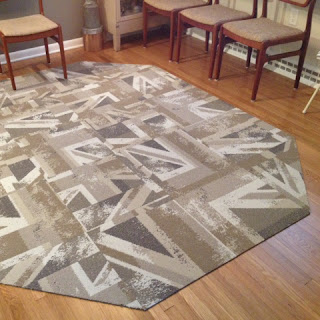
:: defined the whole room with Flor tiles to make everything feel cozy
:: added new knobs to the built ins to add a little more of our eclectic personalities to the space
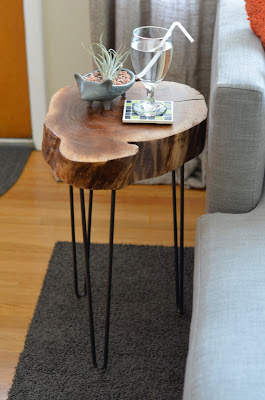
:: built tree stump side tables
:: hung some fun art 
:: brought in some "no maintenance" plants in the form of paper flowers, knit cacti & pom pom flowers.


My advice to anyone designing a space - take your time, only add in things that you absolutely LOVE and you will have a space in the end that you can't help but be proud of.


Photobucket
[p.s. this post may be linked to any number of these blogs]

6.30.2013

loving our Flor

Ever since we moved into our new house 2 years ago, we knew that we were someday going to get some Flor tiles. Flor tiles are 20"x20" carpet squares that can be used for wall-to-wall installations as well as to create custom area rugs.

We loved the idea of Flor because it gives you the freedom to mix & match colors and textures and create an area rug or runner ANY size you want. When dealing with a 24' hallway and a large family room this was the perfect option for us.

We took a trip to the Flor store in Georgetown and LOVED playing with all the samples. We were able to pick some colors and designs we liked and brought home 6x6 samples to confirm our selections.


...Design...
Once we were home, we began drawing out some of our ideas/designs on graph paper. 4 squares = 1 Flor tile. It was simple to layout and visualize this way. Not a fan of pen & paper? You can use their Florbuilder program to get a good visual of what your rug will look like!


Did I mention that Flor will cut their carpet squares in 1/2, 1/4 or diagonal for you (for a small fee)? Trust me - It was worth every penny. We were so glad we didn't have to cut them ourselves when they arrived.

Once we had decided on our layouts, colors & patterns we placed our order. The very NEXT DAY our order had shipped and a few days later we were laying out our Flor tiles in our spaces.


Family room


Hallway

Solid blue - Made You Look "Teal"
zig zag pattern - Good Vibrations "Jade"

Dining table

Overall - Hey Jack "Taupe"

...Assembly...
Assembly of the Flor tiles was pretty simple

We started by dry fitting everything (meaning we put it all together to see how it would look before getting the sticky dots out). Once we had everything situated the way we wanted it, we used the Flor dots to secure the tiles together.


Adam would pull 4 corners up, I would peel off a Flor dot and place it at the intersection and he would carefully lay the corners back down to secure them to the dot. Although you could probably do this alone, it was much quicker & simpler with two sets of hands. We placed a dot everywhere 4 corners met and placed a half dot along the edges where 2 tiles came together. This made for a nice, snug fit and ensured that nothing would move around.

...Price...
Although I won't get into all the pricing details, I have been asked if we think going with Flor tiles is less expensive than buying pre-made area rugs. For our situation... YES!... and I'll explain why:

1) We lucked out with when we ordered. Flor was offering 32% off your entire order! This discount definitely help us a lot. Keep an eye out, because they frequently offer 25% off and/or free shipping.

2) As mentioned above, we were dealing with a 24' long hallway. For us to get a custom runner made from another area rug company would have been very expensive.

3) For what we spent, we could have probably purchased 1.5 area rugs from a normal store. We got 2 large "custom" area rugs & a 24' long runner for this price. To us, "price vs. what we got" seemed like a win win! You can't beat that :)

All in all, we LOVE the outcome. We've waited a long time for area rugs in our home (2 years!) and the spaces finally feel warm & homey.

[P.S. this post in NOT sponsored by Flor - we just love their products]


Photobucket
[p.s. this post may be linked to any number of these blogs]

6.24.2013

pom pom flowers

Raise your hand if you're a plant killer...


For any of you sitting on your couch with your computer in your lap and your hand in the air - this project is for you. 

I kill plants. There, I said it. 

Because of this fact, I've made it my mission to bring low (or no) maintenance "plants" into our home. I've made paper flowers, knit cacti... and now these: pom pom flowers! 

This project was as simple as collecting a few sticks from our backyard, making a few pom poms with some fluffy yarn, and hot glueing them together.


My husband actually gave me the idea to add little "buds" to some of them. I simply knotted my yarn a few times, cut off any excess yarn and then hot glued them on to the sticks where I had trimmed off other small branches.


These simple pom pom flowers help bring "life" into our home while maintaining my "low (no) maintenance" approach.


What do you think? I like how they bring a little bit of added color to our entertainment center. No watering needed.

Photobucket
[p.s. this post may be linked to any number of these blogs]

6.21.2013

before & after: tree table

After we bought our house (and before I started blogging) we had this happen...


Yes, that is a gigantic tree branch... that fell on our house. What's crazy is that you have to look really close to even seen that there is a house there! It was a very sad day for 2 brand new [first time] home owners. After some help from our friends, family & new neighbors we were able to get the backyard cleaned up and Adam fixed our damaged porch roof. Good as new.

What we had now was a large pile of leftover wood from the tree branch that came crashing down in the wind storm. Adam, being the handy man that he is, made this beauty:


It's kind of ironic that this lovely table was part of something that had originally given us such a headache. We love the story behind it and the character that it brings to our family room. 

I think we win, tree!


Here's a simple breakdown of how the project was completed:
1] cut tree limb into a 3"- 4" thick disc
2] allow to dry so bark can be removed
3] sand until smooth
4] coat with polyurethane for durability (Adam did 6 coats with a foam brush)
5] attach legs - we ordered ours from here (note: he was a really great, friendly etsy vendor & the legs are excellent quality. We'll definitely be ordering from him again in the future.)

Photobucket
[p.s. this post may be linked to any number of these blogs]
Related Posts Plugin for WordPress, Blogger...